3DHOP
3D Heritage Online PresenterHow To
Description
This page introduces the setup of advanced camera parameters, as well as a more complete lighting control, useful for an advanced customization of the 3DHOP virtual scene.
Featured Set Scene Elements
- ModelInstances
- Space
Camera and global lighting setup
Click to run live demo
Tuning the 3DHOP advanced camera and lighting features
Set Up Camera Parameters
The design of a virtual environment often requires a fine tuning of the rendering features of the 3D scene. Among these, one can certainly mention the parameters related to the camera setup. Camera settings are particularly useful in changing the appearance of the rendered scene. The motivations for customizing camera parameters can be different, but are mostly related to the aim to present in the best possible way the 3D models visualized. For this reason sometimes the virtual camera needs to be customized depending on the scene managed.
Inside 3DHOP is possible to directly control several parameters defining the camera, that are common across 3D applications:
- The 3DHOP camera may use perspective or orthographic projection. Perspective projection is similar to human sight or to a photo, while orthographic projection is typically used in technical drawings.
- For perspective projection, it is possible to control how wide is the field of view. The FOV value, expressed in degrees, like the focal length of a photo-camera, controls how wide is the area framed by the camera. A FOV of 37 degrees is similar to human sight (and to a 50mm camera lens), smaller values create a zoomed view, while larger values produce wide lens, fish-eye effects.
- Finally, for experienced users, it is possible to control near and far clipping planes, i.e. the limits of the rendering area (for both perspective and orthographic projection).
3DHOP allows to customize the camera parameters through the "space" section in the "setScene" function, as shown below:
var presenter = null;

function setup3dhop() {
  presenter = new Presenter("draw-canvas");

  presenter.setScene({
    ...
    space: {
      ...
      cameraType    : "perspective",
      cameraFOV     : 60.0,
      cameraNearFar : [0.01, 10.0],
      ...
    }
  });
}
By using the "cameraType" field is possible to select also the type of camera projection more suitable for the scene, choosing between "perspective" and "orthographic". The "cameraFOV" field can be used to define the FOV: in degrees, accepts values ranging from 2 to 88. The "cameraNearFar" field can be used to define the near and far clipping planes: accepts positive values, far needs to be bigger than near. The larger is the difference between near and far, the LESS precise is the rendering and measurement. The 3DHOP default camera is a perspective camera, with a FOV of 60 degrees, and a near/far value of [0.01, 10.0]. Be careful changing these values, especially FOV and near/far, because it is really easy to create unusable cameras and wrong renderings.
Beside setting up the camera projection mode at startup, it is also possible to control this feature during the visualization, by calling some ad-hoc JavaScript functions exposed by 3DHOP:
| getCameraType | - | returns the virtual camera projection mode; |
| setCameraPerspective | - | sets the virtual camera on the "perspective" projection mode; |
| setCameraOrthographic | - | sets the virtual camera on the "orthographic" projection mode; |
| toggleCameraType | - | toggles between the virtual camera projection modes; |
The first of these functions ("getCameraType()") returns as output a string that specifies the type of camera projection currently in use ("perspective" or "orthographic"). The second and the third functions ("setCameraPerspective()" and "setCameraOrthographic()") respectively set the camera to use the "perspective" or "orthographic" projection mode, and then automatically redraw the scene. Finally the "toggleCameraType()" function toggles the current projection mode of the camera, switching between "perspective" and "orthographic", and then automatically redraws the scene.
Set Up Global Lighting
A different scene feature that is possible to customize in the "space" section of the "setScene" function, concerns the lighting of the scene. By default, 3DHOP, is using a directional light to illuminate the scene and shade the 3D objects. However, in order to have a shadeless rendering of the models, or when surface/points normals are not present, it is possible to turn off the lighting for the whole scene.
By setting the "sceneLighting" field in the scene setup, as shown in the following code snippet, it is possible to have 3DHOP start with the lighting of the whole scene on or off :
var presenter = null;

function setup3dhop() {
  presenter = new Presenter("draw-canvas");

  presenter.setScene({
    ...
    space: {
      ...
      sceneLighting : true
    }
  });
}
The "sceneLighting" field accepts the boolean values "true" (lighting on, default value) and "false" (lighting off), and acts on all the instances rendered in the 3D scene. 3DHOP provides also a couple of exposed JavaScript functions to interactively drive the lighting feature:
| isSceneLightingEnabled | - | returns the activation status of the scene lighting; |
| enableSceneLighting | - | sets the activation status of the scene lighting; |
The first of the functions above listed ("isSceneLightingEnabled()") returns as output a boolean variable that specifies the lighting activation status ("true" if environmental lighting is on, "false" if it is not); while the second one ("enableSceneLighting(newstate)") set the lighting activation status of the whole 3D scene, taking as input a boolean variable that defines the new status ("true" to set the lighting on, "false" to set it off), and then automatically redraws the scene.
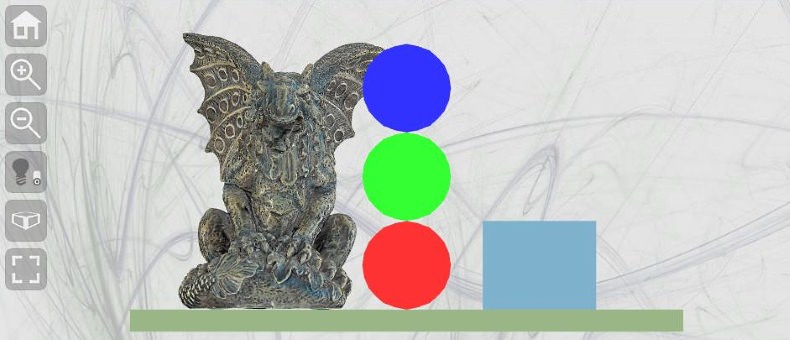
Beside setting up the scene lighting for the whole 3D scene, 3DHOP gives the possibility to independently define if each instance composing the scene would receive (or ignore) the scene lighting. Declaring the instances in the "modelInstances" section, it is possible to set a "useLighting" field: "true" means that the instance will receive scene lighting, while "false" means that the instance will ignore scene lighting. If the "useLighting" field is not explicitly specified, the default value ("true", i.e. receive lighting) will be used. As an example, in the code box here below we present a 3D scene setup with six model instances ("Gargo", "S1", "S2", "S3", "Box",and "Base"), in which the "useLighting" parameter is defined "false" just for two of these ("S1", and "S3"). With the scene "sceneLighting" set to "true" (or not explicitly defined), this setup will lead to a virtual scene with global lighting off for "S1" and "S3", and on for all the other instances:
var presenter = null;

function setup3dhop() {
  presenter = new Presenter("draw-canvas");

  presenter.setScene({
    ...
    modelInstances: {
      "Gargo" : {
        mesh        : "Gargoyle",
        ...
      },
      "S1" : {
        mesh        : "Sphere",
        ...
        useLighting : false
      },
      "S2" : {
        mesh        : "Sphere",
        ...
      },
      "S3" : {
        mesh        : "Sphere",
        ...
        useLighting : false
      },
      "Box" : {
        mesh        : "Cube",
        ...
      },
      "Base" : {
        mesh        : "Cube",
        ...
      }
    },
    ...
  });
}
The "useLighting" parameter gives the chance to set the lighting status of an instance in the 3D scene at the startup. However, to change the lighting conditions of an instance also during interactive rendering, 3DHOP exposes a set of additional JavaScript functions:
| isInstanceLightingEnabledByName | - | returns the lighting activation status of a specific instance selected by name (the unique ID); |
| setInstanceLightingByName | - | sets the lighting activation status of a specific instance selected by name (the unique ID); |
| toggleInstanceLightingByName | - | toggles the lighting activation status of a specific instance selected by name (the unique ID); |
The first of these functions ("isInstanceLightingEnabledByName(ID)") accepts as input parameter the unique ID name string (enclose in quotes) of the desired instance and returns as output a boolean variable that specifies the activation status of the lighting related to the instance ("true" if the instance can receive scene lighting, "false" if it cannot). The second function ("setInstanceLightingByName(ID,newstate,redraw)") set the lighting activation status of an instance; it takes in input three parameters: the ID name string (enclose in quotes) of the desired instance, a boolean variable that defines the new lighting activation status ("true" to let the instance receive scene lighting, "false" to do not) and another boolean variable that ask for an immediate redrawing of the scene ("true" to redraw, "false" to not redraw). Finally the "toggleInstanceLightingByName(ID,redraw)" function toggles on/off the current lighting activation status of an instance; it accepts in input two parameters: the ID name string (enclose in quotes) of the desired instance and a boolean variable that ask for an immediate redrawing of the scene ("true" to redraw, "false" to not redraw).
All the functions above described, also have their corresponding ones capable of acting on groups of instances, using the usual 3DHOP tag system:
| isInstanceLightingEnabled | - | returns the lighting activation status of all the instances which have the specified tag; |
| setInstanceLighting | - | sets the lighting activation status of all the instances which have the specified tag; |
| toggleInstanceLighting | - | toggles the lighting activation status of all the instances which have the specified tag; |
These methods have exactly the same behaviour and parameters of the corresponding "ByName" ones described above, save for the first input parameter that, instead a unique ID, that is now a string specifying the desired tag. All these six functions can use as input for the ID or tag string the constant value "HOP_ALL" (without quotation marks), that indicate that the function will work on ALL the instances of the scene. Please, take a look to the documentation section to find out more.
Obviously these methods, just like others defined for changing the camera projection mode, can be used everywhere in the HTML page, so as to create the most appropriate user interface for the specific case: for example connecting them to a toolbar button, or to a link placed in the page, or again to any other HTML element you want…
In the proposed example we have defined a couple of toolbar buttons for controlling both the scene lighting and the camera projection modes. Let's see how. We need to add new lighting and camera buttons to the classic toolbar (again in the BODY section of the HTML page), in both the version on and off (using the ID "lighting" and "lighting_off" for the lighting, and "perspective" and "orthographic" for the camera), just as shown here:
<div id="3dhop" class="tdhop" onmousedown="if (event.preventDefault) event.preventDefault()">
 <div id="toolbar">
  <img id="home"         title="Home"                src="skins/dark/home.png"         /><br/>
  <img id="zoomin"       title="Zoom In"             src="skins/dark/zoomin.png"       /><br/>
  <img id="zoomout"      title="Zoom Out"            src="skins/dark/zoomout.png"      /><br/>
  <img id="lighting_off" title="Enable Lighting"     src="skins/dark/lighting_off.png"
                                                          style="position:absolute; visibility:hidden;"/>
  <img id="lighting"     title="Disable Lighting"    src="skins/dark/lighting.png"     /><br/>
  <img id="perspective"  title="Perspective Camera"  src="skins/dark/perspective.png"
                                                          style="position:absolute; visibility:hidden;"/>
  <img id="orthographic" title="Orthographic Camera" src="skins/dark/orthographic.png" /><br/>
  <img id="full_on"      title="Exit Full Screen"    src="skins/dark/full_on.png"
                                                          style="position:absolute; visibility:hidden;"/>
  <img id="full"         title="Full Screen"         src="skins/dark/full.png"         />
 </div>
 <canvas id="draw-canvas" style="background-image: url(skins/backgrounds/light.jpg)"/>
</div>
Since in our example we want the perspective camera and the scene lighting on by default, in the above code we hid the "lighting_off" and the "orthographic" button icons at the startup, but obviously a developers can decide to invert the initial logic, showing them and hidding the "lighting" and the "perspective" buttons at the beginning. To make possible for the final user to toggle the global lighting activation status, as well as the projection camera adopted, just clicking on the toolbar buttons, we need to connect the click event to the proper action. As usual in 3DHOP, to do that we can use the "actionsToolbar" function. The following scripting block shows the two new button actions for driving the lighting and the camera logic, added to the "actionsToolbar" function throught two additional "else if" statements:
function actionsToolbar(action) {
  if(action=='home')
    presenter.resetTrackball();
  else if(action=='zoomin')
    presenter.zoomIn();
  else if(action=='zoomout')
    presenter.zoomOut();
  else if(action=='lighting' || action=='lighting_off') {
    presenter.enableSceneLighting(!presenter.isSceneLightingEnabled()); lightingSwitch(); }
  else if(action=='perspective' || action=='orthographic') {
    presenter.toggleCameraType(); cameraSwitch(); }
  else if(action=='full' || action=='full_on')
    fullscreenSwitch();
}
When the final user press the lighting toolbar button the "actionsToolbar" function is called with the "lighting" or "lighting_off" action IDs, and the appropriate action is carried out. In this case, at the begin it are exploited the functions "enableSceneLighting" and "isSceneLightingEnabled", that called in a concatenated way, simply invert the lighting activation status of all the scene (and then redraws it). Finally "lightingSwitch" swaps the lighting button icon from on to off (and vice versa). Concerning the camera toolbar button instead, the "actionsToolbar" function is called with the "perspective" or "orthographic" action IDs. In this case, at the begin it is called the function "toggleCameraType", that simply invert the camera mode used (also redrawing the scene), and then the "lightingSwitch" function, that swaps the camera button icon from perspective to orthographic (and vice versa).
Of course, the reported example shows just a demonstrative use of the declarative fields and methods provided by 3DHOP to act on camera setup and instances lighting. Lots of customizations and combinations are possible to achieve the desired degree of 3D scene personalization.
Camera and combined lighting setup

Click to run live demo
Combining the 3DHOP global and directional light features
Set Up
In the above example we introduced the 3DHOP scene lighting feature… But what if you want to combine this characteristic with the classic 3DHOP directional light control? Starting from the previous example, and only throught small source code changes, this HOW-TO will show you how to build a complete lighting interface (e.g. including scene and directional lighting) with a combined logic.
Since both global lighting and light trackball act on the same 3D scene feature (e.g. the lighting), in 3DHOP these components have been designed to work paired together. This means that all the functions related to each of these two tools are able to detect if in the scene is active also the other component, producing in real-time the more sensible result for the possible final user interactions.
An example can be useful to clarify this concept. Suppose at a certain time your scene lighting is set off, but concurrently the final user decide to enable the light trackball. Without any combined logic the viewer would enter in an undefined status, with the usual scene interactions locked (since the trackball is forced to work for changing the light position), and no visible result of the light interactions on the rendered scene (since to the global lighting is off). To avoid weird behaviours like this, 3DHOP is able to detect the changes of state of the light trackball tool, and consequently to automatically change the status of the global lighting component (and vice versa). So, going back to the example, in the case of scene lighting off and concurrent light trackball enabling event, 3DHOP will automatically turn on the global lighting (also switching the related toolbar buttons, if defined), keeping the viewer in a consistent state.
The combined logic of the lighting components is hardcoded in the 3DHOP viewer, so to define a 3D scene with both the light tools implemented, a developers just have to define the two components in the usual way, without worrying about anything else. So, starting from the source code of the above presented example, we only need to re-add the classic light control button to the toolbar (in the BODY section of the HTML page), in the usual versions on and off, and using the usual IDs "light_on" and "light" (with "light_on" hidden by default):
<div id="3dhop" class="tdhop" onmousedown="if (event.preventDefault) event.preventDefault()">
 <div id="toolbar">
  <img id="home"         title="Home"                  src="skins/dark/home.png"         /><br/>
  <img id="zoomin"       title="Zoom In"               src="skins/dark/zoomin.png"       /><br/>
  <img id="zoomout"      title="Zoom Out"              src="skins/dark/zoomout.png"      /><br/>
  <img id="lighting_off" title="Enable Lighting"       src="skins/dark/lighting_off.png"
                                                          style="position:absolute; visibility:hidden;"/>
  <img id="lighting"     title="Disable Lighting"      src="skins/dark/lighting.png"     /><br/>
  <img id="light_on"     title="Disable Light Control" src="skins/dark/lightcontrol_on.png"
                                                          style="position:absolute; visibility:hidden;"/>
  <img id="light"        title="Enable Light Control"  src="skins/dark/lightcontrol.png" /><br/>
  <img id="perspective"  title="Perspective Camera"    src="skins/dark/perspective.png"
                                                          style="position:absolute; visibility:hidden;"/>
  <img id="orthographic" title="Orthographic Camera"   src="skins/dark/orthographic.png" /><br/>
  <img id="full_on"      title="Exit Full Screen"      src="skins/dark/full_on.png"
                                                          style="position:absolute; visibility:hidden;"/>
  <img id="full"         title="Full Screen"           src="skins/dark/full.png"         />
 </div>
 <canvas id="draw-canvas" style="background-image: url(skins/backgrounds/light.jpg)"/>
</div>
Then, we also need to re-add the light control button action logic to the "actionsToolbar" function, throught the usual "else if" statements (catching the action with the "light" or "light_on" action IDs):
function actionsToolbar(action) {
  if(action=='home')
    presenter.resetTrackball();
  else if(action=='zoomin')
    presenter.zoomIn();
  else if(action=='zoomout')
    presenter.zoomOut();
  else if(action=='lighting' || action=='lighting_off') {
    presenter.enableSceneLighting(!presenter.isSceneLightingEnabled()); lightingSwitch(); }
  else if(action=='light' || action=='light_on') {
    presenter.enableLightTrackball(!presenter.isLightTrackballEnabled()); lightSwitch(); }
  else if(action=='perspective' || action=='orthographic') {
    presenter.toggleCameraType(); cameraSwitch(); }
  else if(action=='full' || action=='full_on')
    fullscreenSwitch();
}
Once this is done, the final vierwer will have both the light component active and perfectly working, also in a combined way: i.e. if while the light trackball is enabled the scene lighting is turned off, automatically also the light trackball will be turned off; and also, if while the scene lighting is off the light trackball is enabled, automatically also the scene lighting will be turned on.
Summarizing, to combine the 3DHOP scene and directional lighting effects, is required just to add the related button icons to the viewer toolbar, and then to specify the related action functions in the usual "actionsToolbar" method. Once this is done, 3DHOP will take care of everything else!