3DHOP
3D Heritage Online PresenterHow To
Description
This page introduces the measurement tool provided by 3DHOP, showing how to set up this simple but useful tool in the viewer.
Measurement Tool
Click to run live demo
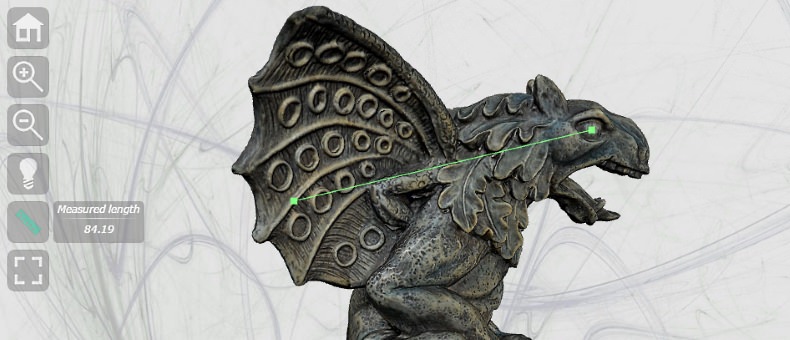
Measuring the 3D scene: making it simple with 3DHOP
Set Up
3DHOP integrates a ready-to-use tool for point-to-point measurement, simple but very easy to use. In the above example, the toolbar button depicting a ruler start the "measuremnt mode": clicking once on the surface of the 3D model sets the first point, clicking again on the surface sets the second point, and the distance between the two chosen points is shown in the interface. 3D models coming from measuring devices such as 3D scanning are "metric", in the sense that their 3D coordinates corresponds to measurements taken in the real world, it makes sense, then, to offer a way to take measurements over the geometry. This especially useful for cultural heritage or scientific visualization. A virtual scene can be a faithful representation of the reality. However, as it often happens when the scene contains 3D models without specific landmarks or reference objects, it may be difficult to fully understand the scale and the size of the 3D entities; the measurement tools makes easier to understand the size of the depicted objects.
To add the measurement tool to your viewer, two steps are needed: the first one is to set-up the HTML components to activate the measurement mode and to display the result (toolbar buttons, and a panel wit some text), while the second one is to register the handle for the measurement event. Let us begin with the first one: how to add a new tool button(s) and output panel to the viewer.
In the previous how-to and examples, the toolbar had no button for the measurement, so let us add one now: this is done by adding two lines in the toolbar definition, defining a pair of icons, one to activate and one to deactivate the measuring tool. These two buttons works similarly to the couple used to turn on/off the light control or the fullscreen. Two suitable icons are already present in the "skin" folder. So, in the BODY of the HTML page, where the toolbar is defined, we add two new clickable images, with ID measure_on and measure, as shown in the following code box:
<div id="3dhop" class="tdhop" onmousedown="if (event.preventDefault) event.preventDefault()">
 <div id="toolbar">
  <img id="home"       title="Home"                  src="skins/dark/home.png"         /><br/>
  <img id="zoomin"     title="Zoom In"               src="skins/dark/zoomin.png"       /><br/>
  <img id="zoomout"    title="Zoom Out"              src="skins/dark/zoomout.png"      /><br/>
  <img id="light_on"   title="Disable Light Control" src="skins/dark/lightcontrol_on.png"
                                                          style="position:absolute; visibility:hidden;"/>
  <img id="light"      title="Enable Light Control"  src="skins/dark/lightcontrol.png" /><br/>
  <img id="measure_on" title="Disable Measure Tool"  src="skins/dark/measure_on.png"
                                                          style="position:absolute; visibility:hidden;"/>
  <img id="measure"    title="Enable Measure Tool"   src="skins/dark/measure.png"      /><br/>
  <img id="full_on"    title="Exit Full Screen"      src="skins/dark/full_on.png"
                                                          style="position:absolute; visibility:hidden;"/>
  <img id="full"       title="Full Screen"           src="skins/dark/full.png"         />
 </div>
 ...
Now, we need to create a space on the webpage where to print out the measured distance. Again, in the BODY section, just after the TOOLBAR and before the CANVAS element used by the 3DHOP rendering, we add a small HTML panel made of a simple HTML DIV containing a SPAN text container, as shown below. Both the div and the span uses specific ID and CLASS (measure-box and output-box for the div, measure-output and output-text for the span), that have been defined in the 3DHOP CSS to have this panel automatically arrange itself in the page, always staying close to the measurement button.
 ...
 <div id="measure-box" class="output-box">
  Measured length<hr/>
  <span id="measure-output" class="output-text" onmousedown="event.stopPropagation()">0.0</span>
 </div>
 ...
As said, the basic behaviour of the measure output panel is to stay close to the toolbar measurement button. It is, however, possible to manually set the position of this pre-made component using the moveMeasurementbox helper function. This function takes as input the horizontal and vertical shift (in pixels) from the left-top corner of the CANVAS (notice that the measure box movement is not confined in the viewer space, but can go over its edges). This function may be called, like in the following example, in the document READY function, after the creation of the scene, to set the position when the page is loaded, but also later on, in any other javascript function.
$(document).ready(function(){
  ...
  moveMeasurementbox(10,10);
});
Now that we have the HTML, components, we can connect them to the 3DHOP viewer. In the script block, we can now add the new button-related actions in the actionsToolbar JavaScript function (that we presented in one of the first HOW-TOs):
function actionsToolbar(action) {
  if(action=='home')
    presenter.resetTrackball();
  else if(action=='zoomin')
    presenter.zoomIn();
  else if(action=='zoomout')
    presenter.zoomOut();
  else if(action=='light' || action=='light_on') {
    presenter.enableLightTrackball(!presenter.isLightTrackballEnabled()); lightSwitch(); }
  else if(action=='measure' || action=='measure_on') {
    presenter.enableMeasurementTool(!presenter.isMeasurementToolEnabled()); measureSwitch(); }
  else if(action=='full'  || action=='full_on')
    fullscreenSwitch();
}
The new code is in the second-last "else if" statement, handling the measure and measure_on action IDs. When the user press the measurement buttons, the actionsToolbar function is called with the appropriate parameter ('measure' or 'measure_on'). The actionsToolbar function enters in this statement and then executes the code here contained. More specifically, when the measurement buttons are pressed, the code presenter.enableMeasurementTool(!presenter.isMeasurementToolEnabled()), toggle the measurement mode (activate it if it was inactive, and vice-versa). The measureSwitch() function then switch the appearance of the measurement button icon, toggles the output panel visibility, and changes the mouse cursor.
Now we have to tell to 3DHOP what should happen when the user has measured a distance on the 3D scene; similarly to what happens when a hot-spot is clicked, when the user takes a measure, an event is fired by 3DHOP (containing the measured distance). We have to define a function that prints the measure in our output panel, and register this function to handle the measurement event. The following code box show the "onEndMeasure" function that we want to use to handle the measurement event; the function gets in input the measured distance, and prints the measure as an html text in the webpage component of ID measure-output (our output panel). The JavaScript instruction .toFixed(2) is used to set the number of decimals when displaying the measure.
function onEndMeasure(measure) {
  // depending on the model measure units, use "mm","m","km" or whatever you have
  $('#measure-output').html(measure.toFixed(2) + " mm");
}
After defining the "onEndMeasure" function, we have to tell 3DHOP to use this function when the measurement event is fired, using the following code, visible at the end of the "setup3dhop" main function:
    ...
    presenter._onEndMeasurement = onEndMeasure;
}
Now the webpage does have a working measurement tool: just load it and press the measurement button to start measuring. The measurement button changes color, the output panel shows up and the mouse cursor changes to a pin. Now, if you click on the surface of the 3d mode, a first point appear: this is the first point of your measure. When you click once more on the 3d model, a second point appears, along with a line connecting the two points, while in the output panel, the measured distance is displayed. If you click again on the model, another point-to-point measure will start. To exit the measurement mode, just click on the toolbar measurement button again.
- It is still possible to rotate ans scale the model in measurement mode, just by dragging the mouse and using the wheel.
- The measure taken is the direct point-to-point distance between the clicked points, and not the distance "on the surface"; the line may pass inside the 3D model.
- Measurement also works on point-clouds.
- It is possible to pick the points on any of the visible instances, it is thus possible to measure the distance between two different instances.
- There is only one measure at a time, each new measure will overwrite the previous one.
- The point-to-point measure is lost if the measurement mode is turned off.
function onEndMeasure(measure, p1, p2) {
// depending on the model measure units, use "mm","m","km" or whatever you have
$('#measure-output').html(measure.toFixed(2) + " mm");
$('#measure-output').append("
"+"P1: [ "+p1[0].toFixed(2)+" , "+p1[1].toFixed(2)+" , "+p1[2].toFixed(2)+" ]");
$('#measure-output').append("
"+"P2: [ "+p2[0].toFixed(2)+" , "+p2[1].toFixed(2)+" , "+p2[2].toFixed(2)+" ]");
}
Substituting to the previous one the "onEndMeasure" function here defined, when you perform a measure you can see in the HTML output panel all the three informations related to the measure itself (distance, first picked point, last picked point).
Your Own Measurement Tool
The measurement tool has been implemented as a ready-to-use functionality of the 3DHOP system, with the pre-made interface described in this how-to, as the simple point-to-point measure is a very widely used tool. So, for basic users, this feature is ready out of the box. It is clear, however, that other more advanced user will want to customize this functionality to cope with their needs. Now, all you need to implement a different interface is to add your HTML components to call, somewhere, the "presenter.enableMeasurementTool( ... )" to make 3DHOP enter in the "measurement mode", while providing and register a different, custom-made handler for the "_onEndMeasurement" event, able to do whatever you want to do with the resulting measure (printing it in a log, sending to a remote database, saving it in a cookie).
A Word On Units
It is important to say something about the numbers returned by the measurement tool: if your 3D models are not in a known scale, or if you have applied some (scaling) transformations to it, measurement may be meaningless. 3DHOP uses the [XYZ] coordinates exactly as they are stored in the 3D models: for this reason, any measurement taken on the 3D models displayed by 3DHOP are in the measure unit of the 3D model. Most 3D models created by triangulation 3D scanning are in millimeters (and so the distance will be in mm), most 3D models created by terrestrial laser scanners are in meters (and so the distance will be measured in meters). If you do not know which unit of measure is used by your 3D model, or if your 3D model is not scaled to any measure unit, the numbers you get by measurement may be funny and not very useful. Furthermore, there is another issue to consider: If you have used your 3D model inside 3DHOP without scaling it, the returned measure is defined IN THE SPACE OF THE MODEL. However, if you have specified some transformation for the mesh and/or for the instance, those transformation will be taken in account when taking the measurement; it is then better to say that the measure is taken IN THE SPACE OF THE SCENE. So, be careful with the transformations, if you want your 3D model to be measurable. If you know that your model in a specific unit measure (say, inches) and you want to display in another unit (say, millimeters), you may convert the measure in the event handler that prints out the measure, just multiply the returned measure by the appropriate factor (for inches to millimeters, multiply by 25.4). It often happens that 3D models created by Structure-from-Motion or dense stereo match (PhotoScan, PPT, Autodesk 123DCatch), or that have been hand-modelled are at an unknown scale. In this case, try to establish a scale factor using some reference with real-world, and apply that scale factor to the measure taken, before displaying it. In any case, it would be better to scale your non-metric models before putting them online inside 3DHOP.
Well, summarizing, to use the 3DHOP measurement tool you just have to add to the viewer the output measure box panel and the new toolbar buttons (setting up the toolbar actions JavaScript function in the proper way). Done this, it only remains to register the right event handler, design the actions to perform when the event is fired and… you are done!
The complete sources of this example are provided together the 3DHOP code in the download section.
If you want instead to learn more about how to retrieve the XYZ position of a point belonging to the 3DHOP virtual scene click here and go to the next HOWTO.