3DHOP
3D Heritage Online PresenterHow To
Description
This page describes how to set up the 3DHOP tool designed to get orthogonal sections of the 3D scene.
Featured Set Scene Elements
- ModelInstances
- Config
Sections Tool
Click to run live demo
Slice the 3DHOP virtual scene and watch it from a new perspective
Set Up
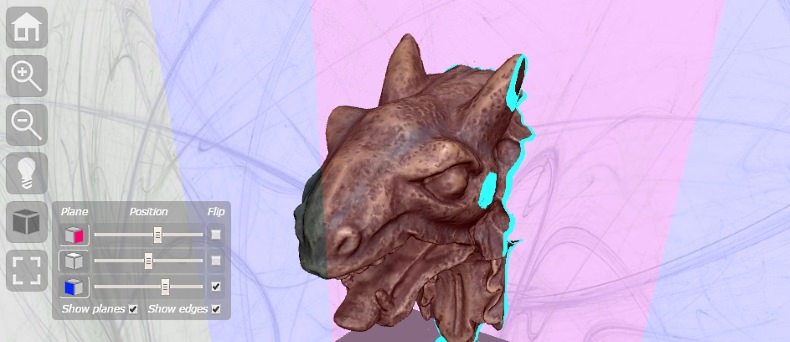
3DHOP offers a ready-to-use tool for sectioning in real-time the 3D models in the scene. In the above example, the toolbar button depicting a three-planes cube opens up the "sectioning" interface. Clicking on one of the three buttons on the left activates/deactivates the X, Y and Z sectioning plane, the three sliders moves the corresponding sectioning plane across the extent of the scene. The "flip" checkboxes invert the direction of the corresponding sectioning plane (changing which half of the 3D model is visible). The two checkboxes in the lower part of the interface toggles the visibility of the sectioning planes and of the highlighted border. This sectioning tool may be useful for various reasons: first of all, it may be used to see the inside of complex objects (showing their inner structures); it can help to perform more accurate measurement, removing some parts of the scene; it may help in understanding the exact positioning of an object in the 3D space and its shape, with respect to the other entities nearby in the scene.
To correctly set up the sectioning tool in the viewer, two steps are needed: the first one is to set-up the HTML components to activate the sectioning tool and the HTML interface, while the second one is to activate the sectioning function in the 3DHOP core. So, let us begin with the HTML, showing how to change the structure of the basic 3DHOP viewer to add the new buttons and a control panel for the sections tool.
Just like for the measurement and pick-point, we have to add to the toolbar the buttons for the sectioning tool: this is done by adding two lines in the toolbar definition, defining a pair of icons, one to activate and one to deactivate the sectioning tool. These two buttons work similarly to the couple used to turn on/off the light control or the fullscreen. Two suitable icons are already present in the "skin" folder. So, in the BODY of the HTML page, where the toolbar is defined, we add two new clickable images, with ID sections_on and sections, as shown in the following code box:
<div id="3dhop" class="tdhop" onmousedown="if (event.preventDefault) event.preventDefault()">
 <div id="toolbar">
  <img id="home"        title="Home"                   src="skins/dark/home.png"         /><br/>
  <img id="zoomin"      title="Zoom In"                src="skins/dark/zoomin.png"       /><br/>
  <img id="zoomout"     title="Zoom Out"               src="skins/dark/zoomout.png"      /><br/>
  <img id="light_on"    title="Disable Light Control"  src="skins/dark/lightcontrol_on.png"
                                                          style="position:absolute; visibility:hidden;"/>
  <img id="light"       title="Enable Light Control"   src="skins/dark/lightcontrol.png" /><br/>
  <img id="sections_on" title="Disable Plane Sections" src="skins/dark/sections_on.png"
                                                          style="position:absolute; visibility:hidden;"/>
  <img id="sections"    title="Enable Plane Sections"  src="skins/dark/sections.png"     /><br/>
  <img id="full_on"     title="Exit Full Screen"       src="skins/dark/full_on.png"
                                                          style="position:absolute; visibility:hidden;"/>
  <img id="full"        title="Full Screen"            src="skins/dark/full.png"         />
 </div>
 ...
Once this is done, we need to add to the viewer webpage a control panel to drive the sectioning tool functionalities. This panel will be hidden by default and will become visible only when the tool is enabled. The default panel, shown in the following code box, is composed by an HTML DIV (with ID sections-box and class output-box) containing two HTML TABLEs (defined by the output-table class). The declaration of the panel has to be specified inside the 3DHOP DIV (of course, in the webpage BODY section), after the TOOLBAR and before the CANVAS element used for the viewer rendering, as showed here below:
 ...
 <div id="sections-box" class="output-box">
  <table class="output-table" onmousedown="event.stopPropagation()">
   <tr><td>Plane</td><td>Position</td><td>Flip</td></tr>
   <tr><td><hr/></td><td><hr/></td><td><hr/></td></tr>
   <tr>
    <td><img   id="xplane_on"    title="…" src="skins/icons/sectionX_on.png" onclick="sectionxSwitch()"
                                        style="position:absolute; visibility:hidden; border:1px inset;"/>
        <img   id="xplane"       title="…" src="skins/icons/sectionX.png"    onclick="sectionxSwitch()"/><br/></td>
    <td><input id="xplaneSlider" class="output-input"  type="range"    title="…"/></td>
    <td><input id="xplaneFlip"   class="output-input"  type="checkbox" title="…"/></td>
   </tr>
   <tr>
    <td><img   id="yplane_on"    title="…" src="skins/icons/sectionY_on.png" onclick="sectionySwitch()"
                                        style="position:absolute; visibility:hidden; border:1px inset;"/>
        <img   id="yplane"       title="…" src="skins/icons/sectionY.png"    onclick="sectionySwitch()"/><br/></td>
    <td><input id="yplaneSlider" class="output-input"  type="range"    title="…"/></td>
    <td><input id="yplaneFlip"   class="output-input"  type="checkbox" title="…"/></td>
   </tr>
   <tr>
    <td><img   id="zplane_on"    title="…" src="skins/icons/sectionZ_on.png" onclick="sectionzSwitch()"
                                        style="position:absolute; visibility:hidden; border:1px inset;"/>
        <img   id="zplane"       title="…" src="skins/icons/sectionZ.png"    onclick="sectionzSwitch()"/><br/></td>
    <td><input id="zplaneSlider" class="output-input"  type="range"    title="…"/></td>
    <td><input id="zplaneFlip"   class="output-input"  type="checkbox" title="…"/></td>
   </tr>
  </table>
  <table class="output-table" onmousedown="event.stopPropagation()" style="text-align:right;">
   <tr>
    <td>Show planes<input id="showPlane" class="output-input" type="checkbox" title="…"/></td>
    <td>Show edges<input id="showBorder" class="output-input" type="checkbox" title="…"/></td>
   </tr>
  </table>
 </div>
 <canvas id="draw-canvas" style="background-image: url(skins/backgrounds/light.jpg)"/>
</div>
This huge chunk of code basically contains a set of typical 3DHOP icons/buttons and HTML INPUT, both checkboxes and ranges (i.e. the control sliders). Explaining line by line all the source code of this panel is not the purpose of this HOW TO. Suffice to say that this HTML block contains the pre-made interface elements used to control the sectioning process: for each of the 3 orthogonal planes there is an icon button to enable/disable the sectioning plane, a slider to move the corresponding sectioning plane, and a checkbox to flip the direction of the section plane. Additionally, you have a pair of "global" checkboxes that controls the visibility of the semi-transparent sectioning plane and of the higlighted section border (for all three sectioning planes). These pre-made components have been defined in the 3DHOP JavaScript and CSS files to be ready-to-use for the casual developer. All the behaviour are configured, and the panel arrange itself in the page, always staying close to the section toolbar buttons. Simple changes in graphic appearance and arrangement may be done just modifying this block: changing graphic files, text, and maybe removing some of the options and functionalities of the sectioning tool just by removing the corresponding interface part (you do not want your users to slice on the Z axis? then simply remove the buttons and slider related to the Z axis from the interface). More advanced changes in behaviour of the tool may be achieved with some editing of the "init.js" and "3dhop.css" files.
As said, the basic behaviour of the Sections control panel is to stay close to the toolbar sections button. It is, however, possible to manually set the position of this pre-made component using the moveSectionsbox helper function. This function takes as input the horizontal and vertical shift (in pixels) from the left-top corner of the CANVAS (notice that the Sections control panel movement is not confined in the viewer space, but can go over its edges). This function may be called, like in the following example, in the document READY function, after the creation of the scene, to set the position when the page is loaded, but also later on, in any other javascript function.
$(document).ready(function(){
  ...
  moveSectionsbox(10,10);
});
At this point, we have all the HTML components ready, and only the javascript functions are to be added. We need to initialize the sectioning tool. The sectiontoolInit() function is used to initialize the sections and to connect the HTML interface to the 3DHOP core. This function should be called after the 3DHOP scene has been created: for example, a good place to do so is the $(document).ready function, just after the 3DHOP initialization and setup, as shown in the next code box. Alternatively, the sectiontoolInit() function call may be placed at the very end of the setup3dhop() function, after the presenter.setScene(... call:
$(document).ready(function(){
	init3dhop();
	setup3dhop();

	sectiontoolInit();
});
The only thing missing to get a fully functioning sectioning tool is to link the toolbar button with the proper action: as usual, this happens in the actionsToolbar JavaScript function (already presented in one of the first HOW-TOs):
function actionsToolbar(action) {
  if(action=='home')
    presenter.resetTrackball();
  else if(action=='zoomin')
    presenter.zoomIn();
  else if(action=='zoomout')
    presenter.zoomOut();
  else if(action=='light' || action=='light_on') {
    presenter.enableLightTrackball(!presenter.isLightTrackballEnabled()); lightSwitch(); }
  else if(action=='sections' || action=='sections_on') {
    sectiontoolReset(); sectiontoolSwitch(); }
  else if(action=='full'  || action=='full_on')
    fullscreenSwitch();
}
The new code is in the second-last "else if" statement, handling the sections and sections_on action IDs. When the user press the pick-point buttons, the actionsToolbar function is called with the appropriate parameter ('pick' or 'pick_on'). The actionsToolbar function enters in this statement and then executes the code here contained. More specifically, when the section buttons are pressed, the code sectiontoolReset() resets the sectioning panel components (checkboxes, sliders and buttons), while the sectiontoolSwitch() function activate toggles the visibility of the sections control panel.
Advanced Configuration
With these final changes in the actionsToolbar JavaScript function, the minimal setup of the sectioning tool it is over, and the sections should be working as described. However, a couple of additional features are worthy to be introduced:
- Setting which instances of the scene may be sectioned, and which may not
- Setting the default values for showing the section planes and the section border, and set the rendering options for the section border
... presenter.setScene({ ... modelInstances : { "Gargo" : { mesh : "Gargoyle" }, "Base" : { mesh : "Cube", transform : {translation: [0.0, -5.0, 0.0],scale: [3.0, 0.2, 3.0] }, clippable : false } }, ... }); ...
The other optional configurations may be specified in a section, called "config", of the scene definition that is the parameter of the "setScene" function. The sectioning semi-transparent planes and the section border are useful in many situations, but may also be distracting. It is possible to turn them on and off at runtime, but is also possible to set the default visibility. To set the default visibility of sectioning planes and borders we can use, respectively, the two properties "showClippingPlanes" and "showClippingBorder"; both properties need a boolean value (true is the default for "showClippingPlanes", while false is the default for "showClippingBorder"). Finally, if we want to change the graphic appearance of the section borders, we can use the two properties "clippingBorderSize" and "clippingBorderColor". As the names suggest, "clippingBorderSize" change the thickness of the colored sectioning border, and is expressed in the same measure unit of the 3D model. "clippingBorderColor" controls the color of the border itself (this property accepts as input a 3-dimensional array containing RGB [0-1] color values, with default value set to [0.0, 1.0, 1.0]):
      ...
      config : {
        showClippingPlanes  : true,
        showClippingBorder  : true,
        clippingBorderSize  : 0.5,
        clippingBorderColor : [0.0, 1.0, 1.0]
      },
      ...
    });
    ...
It's important to remark that these last properties set out in the "config" sections are optional, they are provided by 3DHOP just to better configure the rendering, but are not mandatory for a minimal configuration of the sections tool.
Your Own Sectioning Tool
The sectioning tool has been implemented as a ready-to-use functionality of the 3DHOP system, with the pre-made interface described in this how-to, as the basic sectioning along the main axis is a very widely used tool. So, for basic users, this feature is ready out of the box. It is clear, however, that other more advanced user will want to customize this functionality to cope with their needs. 3DHOP DOES offer more low-level functions to manually set sectioning planes, and directly control the sections using JavaScript functions (instead of the pre-defined interface). Those functions and structures will be described in detail in a following tutorial.
So, summarizing, to place set up the interactive 3DHOP sectioning tool on the 3D virtual scene you just have to add to the viewer the section panel and the new toolbar buttons (setting up the toolbar actions JavaScript function in the proper way). This done, it only remains to initialize the sectioning tool in the webpage "ready" function and… you are done!
The complete sources of this example are provided together the 3DHOP code in the download section.
If you want instead to learn more about how to set up a one-click tool for taking wonderful screenshots of the 3DHOP scene click here and go to the next HOWTO.